
In this episode we will take a look at how to use a keypad with the password library to make a password activated locking mechanism with your Arduino…
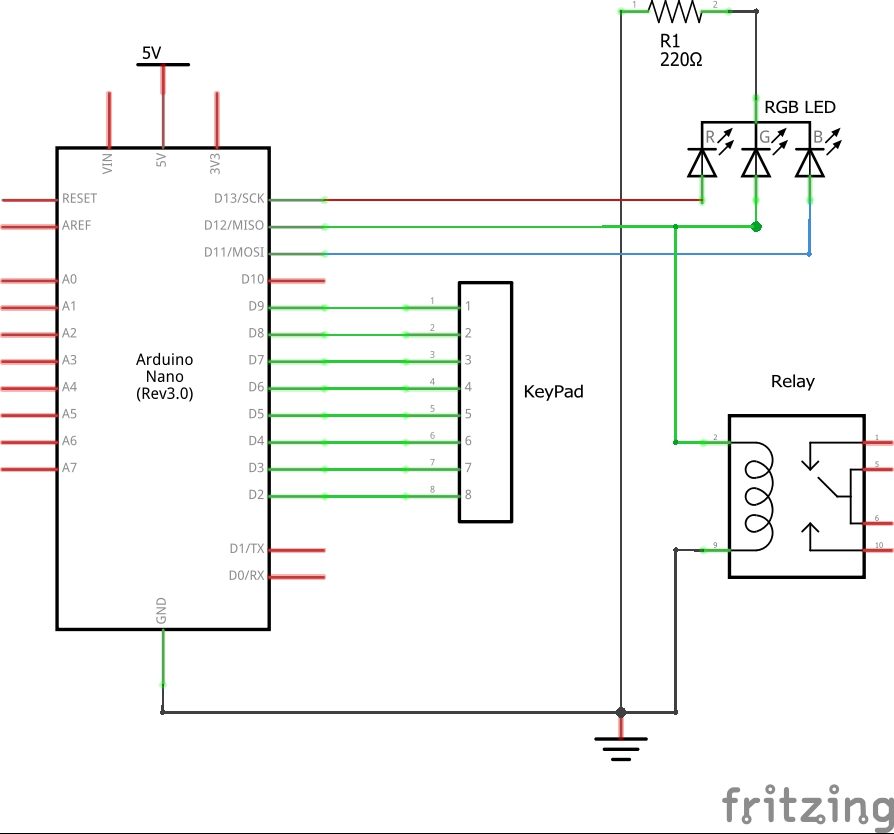
Schematic:
Parts List:
affiliate links
Arduino Code:
#define red 13
#define lock 12 // green
#define blue 11
#include <Password.h>
#include <Keypad.h>
Password password = Password (“123A”);
const byte ROWS = 4;
const byte COLS = 4;
char keys[ROWS][COLS] = {
{‘1′,’2′,’3′,’A’},
{‘4′,’5′,’6′,’B’},
{‘7′,’8′,’9′,’C’},
{‘*’,’0′,’#’,’D’}
};
byte rowPins[ROWS] = {9, 8, 7, 6}; //connect to the row pinouts of the keypad
byte colPins[COLS] = {5, 4, 3, 2}; //connect to the column pinouts of the keypad
Keypad keypad = Keypad( makeKeymap(keys), rowPins, colPins, ROWS, COLS );
void setup()
{
pinMode(red,OUTPUT);
pinMode(lock,OUTPUT);
pinMode(blue,OUTPUT);
digitalWrite(blue,HIGH);
keypad.addEventListener(keypadEvent);
}
void loop()
{
keypad.getKey();
}
void keypadEvent(KeypadEvent eKey)
{
switch (keypad.getState())
{
case PRESSED:
switch (eKey)
{
case ‘*’: checkPassword(); break;
case ‘#’: password.reset(); break;
default: password.append(eKey);
}
}
}
void checkPassword()
{
if (password.evaluate())
{
digitalWrite(blue,LOW);
digitalWrite(lock,HIGH);
delay(2000);
digitalWrite(lock,LOW);
digitalWrite(blue,HIGH);
password.reset();
}
else
{
digitalWrite(blue,LOW);
digitalWrite(red,HIGH);
delay(2000);
digitalWrite(red,LOW);
digitalWrite(blue,HIGH);
password.reset();
}
}


