
In this episode we will take a look at how you can use rotary encoders with your Arduino board.
affiliate links
Rotary Encoders
Check us out on Facebook!
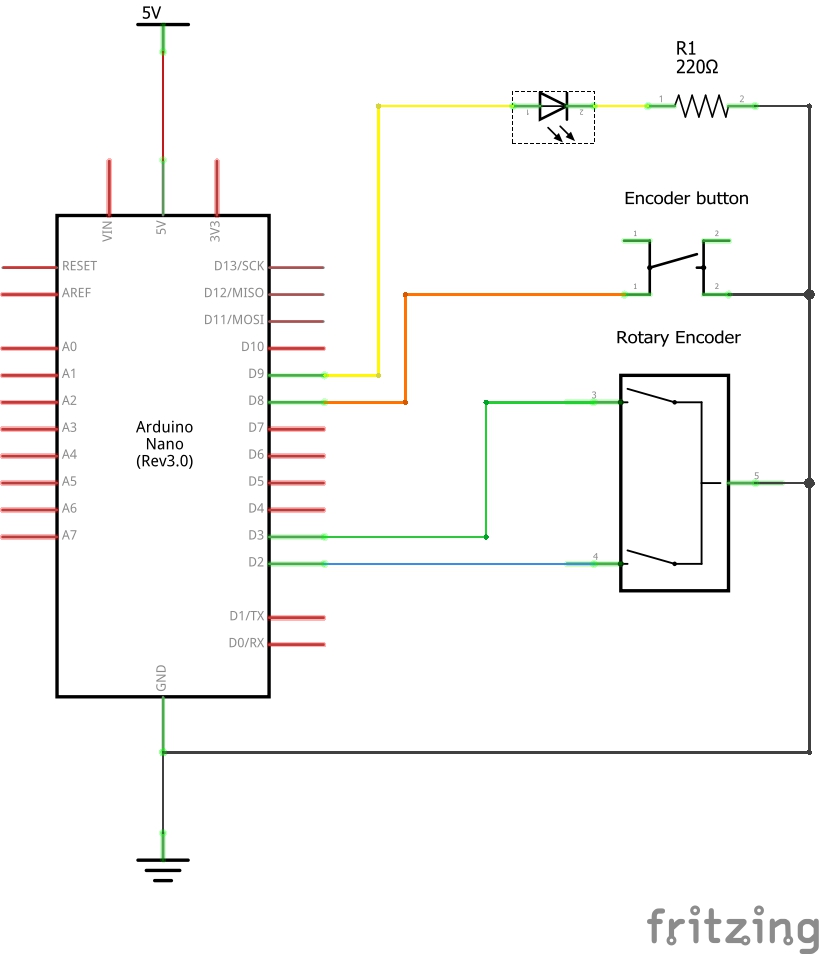
Schematic:
ARDUINO Code:
#define led 9
#define encoderPinA 2 // right
#define encoderPinB 3 // left
#define clearButton 8 // switch
int encoderPos = 0; // a counter for the dial
unsigned int lastReportedPos = 1; // change management
static boolean rotating = false; // debounce management
boolean A_set = false;
boolean B_set = false;
void setup() {
pinMode(encoderPinA, INPUT_PULLUP); //enabling pullups
pinMode(encoderPinB, INPUT_PULLUP);
pinMode(clearButton, INPUT_PULLUP);
pinMode(led,OUTPUT);
attachInterrupt(0, doEncoderA, CHANGE); //pin 2
attachInterrupt(1, doEncoderB, CHANGE); //pin 3
Serial.begin(9600); // output
}
void loop() {
rotating = true; // reset the debouncer
if (lastReportedPos != encoderPos) {
Serial.println(encoderPos);
lastReportedPos = encoderPos;
}
if (encoderPos > 255)
{
encoderPos = 255;
}
if (encoderPos < 0)
{
encoderPos = 0;
}
if (digitalRead(clearButton) == LOW ) {
encoderPos = 0;
}
analogWrite(led,encoderPos);
}
// Interrupt on A changing state
void doEncoderA() {
// debounce
if ( rotating ) delay (1); // wait a little until the bouncing is done
// Test transition, did things really change?
if ( digitalRead(encoderPinA) != A_set ) { // debounce once more
A_set = !A_set;
// adjust counter + if A leads B
if ( A_set && !B_set )
encoderPos += 10;
rotating = false; // no more debouncing until loop() hits again
}
}
// Interrupt on B changing state
void doEncoderB() {
if ( rotating ) delay (1);
if ( digitalRead(encoderPinB) != B_set ) {
B_set = !B_set;
// adjust counter – 1 if B leads A
if ( B_set && !A_set )
encoderPos -= 10;
rotating = false;
}
}


