
There are thousands of uses for relays and this free app I wrote will let you control up to 12 of them with a ARDUINO board and an ANDROID phone or tablet.
Use this app to control your greenhouse, hydroponics or even your sprinkler systems .

Check us out on Facebook!
Disclamer:
All the info in this tutorial is for educational purpuses, if you chose to build and use this project we are not responsible for any damage, injuries or DEATH !!!!!!!!!!!!!!!!!!!!!!! Build at your own RISK!!!!!!!!!!!!!!!!!!!!!!!!!!!!!!!!!!!!!!!!!!!!!!!!!!!!!!!!!!!!!!!!!!!!!!!!!!!
Click below for a video tutorial for this project.
THE APP:
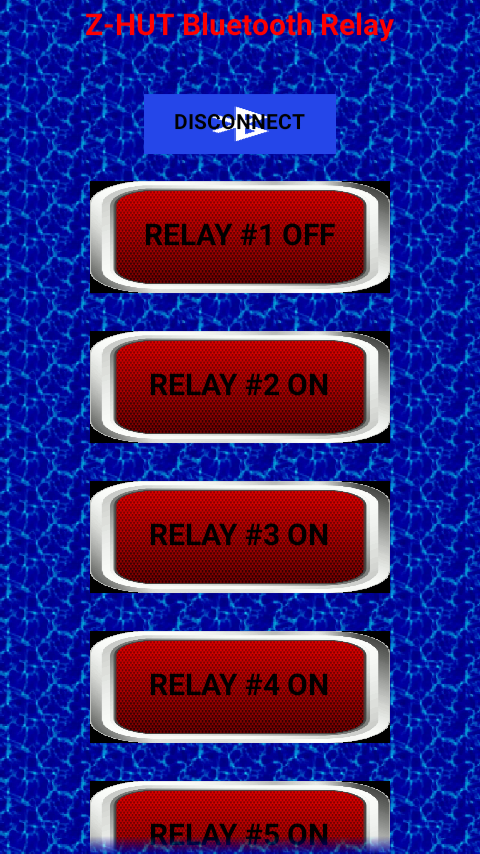
I wrote this APP to be straight forward and easy to use.
You can download the APP at this link for free: GET THE FREE RELAY APP
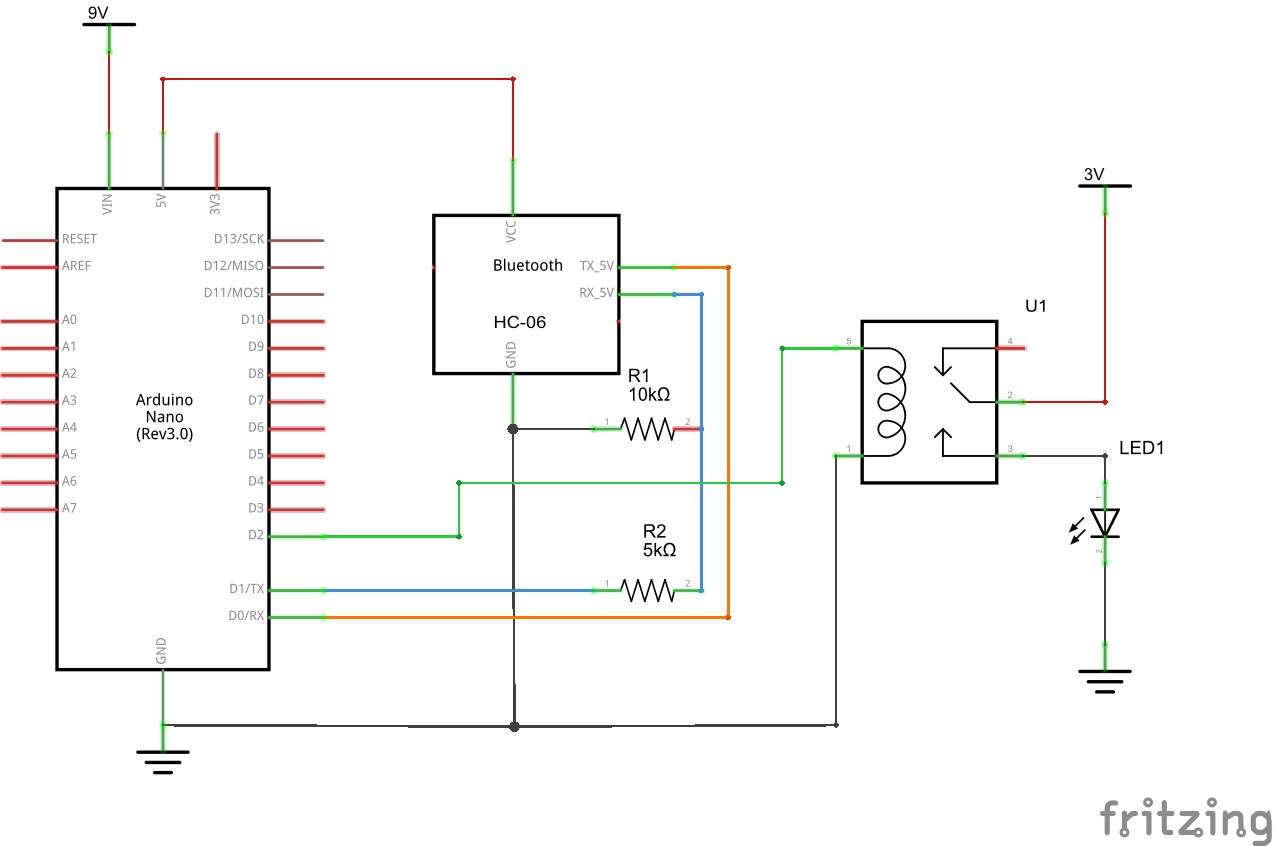
BUILDING THE CIRCUIT:
This circuit is easy to build and not a lot of parts will be needed. Now if you’re not using a self-powered optically isolated relays please go to the following link to learn how to use optocoupler’s with relays, you may also need to use transistors to activate the relays.
If you are using the easy to use powered relays like the one in the picture at the top of this page you wont have to add anything. Make sure the relays you use will be activated by 5 volts and can handle the amps & voltage you are going to use them at.
Parts List:
#affiliate links#
ARDUINO Board (I used a nano but most ARDUINO boards will work)
The Circuit:
Modify to your needs. relay 1 is on pin 2, relay 2 is on pin 3 , relay 3 is on pin 4 and so on. If you use all 12 relays the last one relay 12 on pin 13 will turn on and of a few times when you first power it up.. You can use 1 or all 12 relays, the app and arduino will work fine if they are not all connected..
The LED connected to the relay is just a example for how it can be used…….
The ARDUINO Code:
Just copy and past this code into your arduino IDE, Dont change any thing….!!!!!!!!!!
int relay1 = 2;
int relay2 = 3;
int relay3 = 4;
int relay4 = 5;
int relay5 = 6;
int relay6 = 7;
int relay7 = 8;
int relay8 = 9;
int relay9 = 10;
int relay10 = 11;
int relay11 = 12;
int relay12 = 13;
void setup() {
Serial.begin(9600);
pinMode(relay1, OUTPUT);
pinMode(relay2, OUTPUT);
pinMode(relay3, OUTPUT);
pinMode(relay4, OUTPUT);
pinMode(relay5, OUTPUT);
pinMode(relay6, OUTPUT);
pinMode(relay7, OUTPUT);
pinMode(relay8, OUTPUT);
pinMode(relay9, OUTPUT);
pinMode(relay10, OUTPUT);
pinMode(relay11, OUTPUT);
pinMode(relay12, OUTPUT);
}
void loop() {
if (Serial.available() >= 2 )
{
unsigned int a = Serial.read();
unsigned int b = Serial.read();
unsigned int val = (b * 256) + a;
if (val == 100) // relay #1 on
{
digitalWrite(relay1, HIGH);
}
else if (val == 200) // relay #1 off
{
digitalWrite(relay1, LOW);
}
else if (val == 300) // relay #2 on
{
digitalWrite(relay2, HIGH);
}
else if (val == 400) // relay #2 off
{
digitalWrite(relay2, LOW);
}
else if (val == 500) // relay #3 on
{
digitalWrite(relay3, HIGH);
}
else if (val == 600) // relay #3 off
{
digitalWrite(relay3, LOW);
}
else if (val == 700) // relay #4 on
{
digitalWrite(relay4, HIGH);
}
else if (val == 800) // relay #4 off
{
digitalWrite(relay4, LOW);
}
else if (val == 900) // relay #5 on
{
digitalWrite(relay5, HIGH);
}
else if (val == 1000) // relay #5 off
{
digitalWrite(relay5, LOW);
}
else if (val == 1100) // relay #6 on
{
digitalWrite(relay6, HIGH);
}
else if (val == 1200) // relay #6 off
{
digitalWrite(relay6, LOW);
}
else if (val == 1300) // relay #7 on
{
digitalWrite(relay7, HIGH);
}
else if (val == 1400) // relay #7 off
{
digitalWrite(relay7, LOW);
}
else if (val == 1500) // relay #8 on
{
digitalWrite(relay8, HIGH);
}
else if (val == 1600) // relay #8 off
{
digitalWrite(relay8, LOW);
}
else if (val == 1700) // relay #9 on
{
digitalWrite(relay9, HIGH);
}
else if (val == 1800) // relay #9 off
{
digitalWrite(relay9, LOW);
}
else if (val == 1900) // relay #10 on
{
digitalWrite(relay10, HIGH);
}
else if (val == 2000) // relay #10 off
{
digitalWrite(relay10, LOW);
}
else if (val == 2100) // relay #11 on
{
digitalWrite(relay11, HIGH);
}
else if (val == 2200) // relay #11 off
{
digitalWrite(relay11, LOW);
}
else if (val == 2300) // relay #12 on
{
digitalWrite(relay12, HIGH);
}
else if (val == 2400) // relay #12 off
{
digitalWrite(relay12, LOW);
}
}
}


