
On this episode of basic Arduino we will take a look at how to setup and use the I2C controlled 1602 LCD display with our Arduino boards.
Check us out on Facebook!
Download the ARDUINO I2C LCD Library Here!
How to find the address of any I2C device connected to your Arduino board
Parts List:
affiliate links
ARDUINO Board
1602 LCD Display
Potentiometer
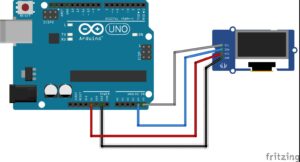
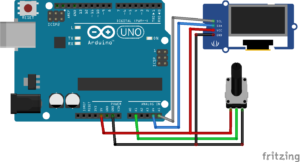
Schematic’s:
ARDUINO Code:
// CUSTOM TEXT:
#include <Wire.h>
#include <LiquidCrystal_I2C.h>
LiquidCrystal_I2C lcd(0x27, 2, 1, 0, 4, 5, 6, 7, 3, POSITIVE); // Set the LCD I2C address
void setup()
{
lcd.begin(16, 2); // initialize the lcd for 16 chars 2 lines, turn on backlight
lcd.clear();
}
void loop()
{
lcd.setCursor(5, 0);
lcd.print(“BASIC”);
lcd.setCursor(4, 1);
lcd.print(“ARDUINO”);
delay(2000);
lcd.clear();
delay(2000);
}
//LCD Potentiometer:
#include <Wire.h>
#include <LiquidCrystal_I2C.h>
LiquidCrystal_I2C lcd(0x27, 2, 1, 0, 4, 5, 6, 7, 3, POSITIVE);
void setup()
{
lcd.begin(16, 2); // initialize the lcd
lcd.clear();
}
void loop()
{
int val = (analogRead(A1)); //read analog pin A0
lcd.setCursor(5, 0);
lcd.print(“VALUE=”);
lcd.setCursor(6, 1);
lcd.print(val);
delay(500);
lcd.clear();
}


